
Today’s blog post is on how to set up a Word document to write your family history book. After opening Word to a new document, your ribbon and blank page will look like this:

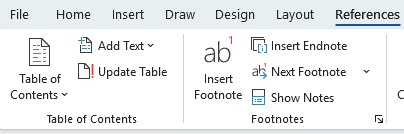
Click on ‘References” on the top line of the Ribbon. You’ll see what it looks like below:
Now, click on Table of Contents. I select the basic style but you have options for whatever you envision. You will get a message that you have no items for the Table of Contents. No, you don’t so that’s fine but you will soon.
You have two options now – you can start writing and add to the Table of Contents as you complete sections or you can set up the entire book outline first. It makes no difference which you choose. For my example, I am setting up Word with nothing written yet.
Next, I’ll click on the ribbon “Insert” and under Header & Footer, click Page Numbers. I want them at the bottom middle of the page. Again, whatever is your preference is fine. The first page of your book begins with the Table of Contents. If you want your first page to begin with the writing itself, you will have to create a page break at the bottom of the page but I’m skipping that for now, setting up the rest of the book.
How do you get items to add to the Table of Contents? Easy.
On the ribbon from the Home option, look in the middle and you’ll see Styles. If you click on the down arrow on the right you’ll see so many more choices:

I stick with the three Heading options. The largest Heading I use for Chapter titles, Heading 2 is for my Pedigree Charts, and the biographies are Heading 3. When I begin writing the page will change from this:

To this:

Why is the info I just typed not showing under Contents? Because I need to update the Table of Contents as I add to it. To do that, simply go back to References on the Header and click under the Table of Contents section – Update Table. It will display the following:

My personal preference is to use Times New Roman, size 12 font for the writing. The default for the heading styles is Aptos (Body). You can change it to whatever you want, but I tend to leave it so that it stands out differently from the rest of the page. I also make sure, under Style, that I have clicked “No Space” when writing the bios, as I want to conserve space as I write. Remember, your book will cost by how many pages and other selections that you have made (hardcover vs. paperback vs. eBook and color photos or not). I’d rather splurge on the color photos I’m including than on the page length.
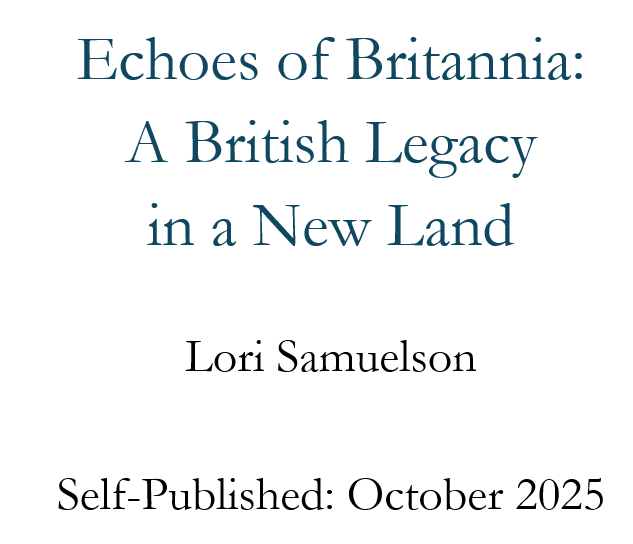
I like to include a Title Page and it’s tricky to get it added. Here’s a workaround for that.
On the ribbon, under Insert, click Cover Page. I pick Sideline because there is limited color and text there. Don’t worry – you will delete the words and lines that are on this page easily by just clicking and hitting delete. I then have a front page with NO PAGE NUMBER. I will use Garamond font for the information. Click Insert on the ribbon and select a Text Box – anyone will do.
Now, click in the box and delete the words. Go to the edge of the box and make the box larger so that you can type your book title, your name, and Self-Published: (date). I use 48 size for the title and 36 for the subtitle, my name, and publication info. Next, I click on the box outline because I want a clean page, but you can leave it if you like it. When I right-click on the line, I get the option of Fill and Outline at the bottom. I select Outline and click No Outline. My title page now looks like this:
As you write, you will want to use endnotes or footnotes. Although I’d prefer a clean page and have the sources in the back, I had difficulty getting the page numbers to accommodate that, so I went with footnotes. To add a footnote, simply go to References – Insert Footnote. Word automatically will keep the numbers in order, and your cursor will move down to the bottom of the page where you’ll include your source.
After my book is written, I then add the photos, clips of documents, or graphics that I think will make it more appealing to my readers. All of my photos are digitized, so I don’t have to scan them in, but you may have to do that with some of yours.
When I find a photo I like, I simply right-click and copy. Then, I place it where I want to put it on a page by clicking Ctrl + V to paste:

Next, I’ll click on the picture and select Insert Caption. I’ll type in the box what the picture is about. Mine defaults to Figure 1, but I can easily change it to Photo by simply typing that in and deleting “Figure.” You may want to move the photo elsewhere on the page or change the size. Just left-click on the photo and click the box with the upside-down U that appears. I tend to click the middle option on the top – the upside-down U, as it lets the text wrap around the photo.
When I’m done writing my book, I’ll want to include an index. There are several ways to compile one, and they are all a pain in the neck. I have tried using the Word feature, but was not happy with it because it is difficult to read the text for last-minute edits and changes the page numbers. For my last two books, I did it the old-fashioned way – created an index by reading through my book and typing the Subject and Page Number in a second document. I do have three screens on my computer, which makes this doable. If you have only one, you can minimize the two pages so they share the screen. My preference is to make the page numbers in bold, but again, it’s your book and your choices.
After I compiled the index, I typed “Index” using the largest Heading under style and made sure that I went back to References to Update the Table of Contents.
On the document where I created the Index, I clicked on Layout and selected Columns – 2. That saves more space.
On the very end of the last page of my book, from the Insert tab on the ribbon, I click Page Break. The reason is that I don’t want the Index that I’m going to copy and paste into the book to format the rest of the book into two columns. After you’ve added the page break, go to the next page and copy (Ctrl + C) and paste (Ctrl + V) the Index from where you compiled it to your book.
Sometimes, but not always, I run into a problem where the page numbers begin with 1 again. Here’s the quick fix if that happens to you. Go to Insert – Page Numbers – Format Page Numbers and click the box that says to continue from the previous section.
I have the free version of Grammarly installed on Word so it highlights in red issues that need to be addressed – like a comma needed where I didn’t put it. Definitely check out your punctuation and spelling before uploading your finished product for printing.
Next week I’ll be providing you the directions on how to use Kindle Direct Publishing for printing your book. There are many other options available but I went with Kindle for several reasons – the cost was low, I’d had previous experience with it, and Amazon does the marketing.
Instead of having a beach read this Memorial Day, take your laptop and get started on writing your family history!